
Create a chic DIY Halloween plate wall using dollar store plates, glass paint, and stencils! Learn how to create this magazine look for less with my step-by-step tutorial.

When it comes to decorating for Halloween and the fall, there is no need to sacrifice style for spooky! In fact, creating chic Halloween decor that easily transitions into fall helps save time and money. Instead of having to switch out your decor for each holiday, you can simply tweak a few key elements to create a new look. My chic yet spooky plate wall looks beautiful above the mantel and serves me well from September through November! Read on for the full tutorial on how to create your own DIY Halloween plate wall using a few craft supplies and inexpensive plates.
How to Create a Halloween Plate Wall
For this project you will need the following:
- Gloss White Glass Paint
- Metallic Black Glass Paint
- Frost White Glass Paint
- Adhesive Silk Screen Stencils
- Pouncer Set
- Squeegee Set
- Glass Scraper & Pick Set
- Rubbing alcohol & cotton balls
- Plates

Step 1 for Halloween Plate Wall: Clean your plates and then adhere stencil to desired location on plate.
Step 2: Add paint and use squeegee to distribute paint evenly.

Step 3: Cure your paint before using as decor.
Your plates are not food safe, but they can be cured to help paint adhesion by air drying for 21 days, or by baking them in the oven for 30 minutes at 350°.
Step 4: Hang your plates using adhesive plate hangers.
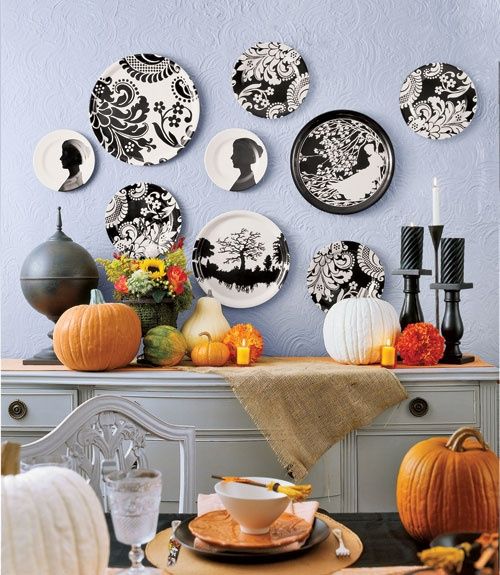
Below is a close-up picture of all the plates I painted. For the tree and silhouettes, I created a stencil on adhesive vinyl using my digital cutting machine and then painted the stencils with black paint. I love the way they all turned out! On the black plates note that I used the frost paint with some of the stencils to create a “ghostly” feel. I hung the plates on the wall by attaching adhesive plate hangers to the backs of each plate. I think this spooky chic mantel will transition from fall into Halloween perfectly!

Below is my plate wall inspiration image from Country Living.
And here is my knock-off version! Not too shabby, eh?

If you liked this project, you might also like my Plaid Breakfast, Lunch, and Dinner Stenciled Plates and Napkins.


Your plates are beautiful! You inspired me, I think I just might try making some of these for my house! I just moved and there are plenty of walls I need something to fill them and these are a great idea! Thank you very much for sharing.
What a gorgeous project! Mind if I ask a technical question? How did you mount all of the plates to the wall? I’m adverse to putting holes in my walls….
Thanks Jenny! I used 3m velcro stips. Although I must say that they didn’t hold and a few of the plates had to come down.
These plates are gorgeous,and I love your entire mantel. The ottoman you have is also so very pretty.
Absolutely fabulous. I love them all, what a great idea.
LOVE your version better…shhhh…can I say that?! WOW! You did an AMAZING job!
I’m a sucker for a fabulous plate wall – gorgeous!
Kelly
it looks gorgeous Beth! I like yours better!
It looks great! I love the little pillow/ottoman thingy on the floor. It’s awesome!
Love the unique look, they’d be a fun to personalize or add a little monogram, or for a gift, or a collection for Christmas, or…. 🙂
Wow , almost perfect match from Country Living. The plates look fantastic, nicely done!
Beautiful job! Every bit as pretty as the original!
I had seen the Country Living photo and just ordered some silhouette plates of our family because I loved it so much. Will definitely have to try the Martha Stewart paints!
Heather
These plates turned out beautiful! I’m in love with the tree plate! What a great idea and your mantel looks lovely! Where did you get that fluffy ruffled poof ottoman? GORGEOUS! Thanks for linking it up to the Fall Countdown Party too!
Thanks! The poof was a Joss & Main splurge :).
The plates look fantastic, I love how your entire mantel turned out!
Thanks Jen!
Your version is perfect! Thank you for sharing and inspiring me to do some thing similar with an antique dresser. Have a great weekend!
Oooo fun Ann!
Gorgeous! I love your version! Stunning! =)
Jeanine
Thanks Jeanine! Now if only I could get my photography skills to match that of Country Living…. 🙂
I was wondering what you were going to create with all of those plates. LOVE it! They look so great together. I am a huge fan of Martha’s paints, and more recently, her glitter.
Ha! The cashier at the dollar store thought I was crazy and upon checking out asked me what I was doing with the plates on the floor. I showed her my inspiration pic on my phone but she still didn’t get it. LOL! And yes, a girl can never have too much Martha glitter!
Great idea! Love your plates.. Can you give me info on your poof? Love it!
Thanks Rita! I bought the poof at a Joss & Main sale. http://pinterest.com/pin/234820568041537382/
This is incredible! Yours looks magazine worthy, I must say! I’m not usually a fan of hanging plates on the wall, but I think this might change my mind. That tree one is gorgeous.
Thanks Lauren! I’m not much of a “plate on wall” girl myself but I loved this look (and that it is temporary)!
Love love LOVE! I have been wanting to do a plate wall for the longest time but have had a heck of a time finding the right plates. This is perfect! Thank you!
Glad you like it Ruth!
Great, Great, Great job Beth! Hope you’re well, looks like you’re up to great goodness over there. 🙂
And the bar of fabulousness is raised!! Beautifully done, as always..
Thanks Haydee!
I love your plates! They look SO great on your mantel!
Jo-Anna
What a pretty mantel Beth!! I love the plates – the designs you did are so great!
Thanks Bev!
This is so great Beth!!! These paints are so great! XO, Aimee
Thanks Aimee! And yes, I haven’t been disappointed with the Plaid Martha Stewart line yet :).
Wow, Beth! Your plates look fantastic! I’ve been using the MS Acrylic Paint since it came out and love the quality and coverage compared to other brands. Something tells me I’ll be stocking up on glass paints in the future!
Thanks Claire!
It looks so beautiful Beth and the plates are just fantastic!! Has me wanting to go “tweak” my own mantels some more! 😉
Vanessa
Love this…going to have to try it!
Thank you Kristen :).
holy moly, beth! these are awesome. the plates turned out so well & your fall fireplace is stunning!
xo
kellie
Thanks Kellie!