
Today I’m going to share with you how I made my Halloween chalkboard used in my Halloween mantel! This is such an easy and gratifying project that is perfect for temporary seasonal projects or a special event. Let’s get to it!
How to Make a Chalkboard
Supplies needed:
- 1/2-in x 4-ft x 8-ft Expanded Polystyrene Insulated Sheathing (around $10.50 a sheet).
- Zinsser Bullseye 123 spray primer (or any adhesion primer).
- Valspar Flat Black paint (or any flat black paint–chalkboard paint isn’t necessary).
- Sponge craft paint brush.
- Kobalt 6 blade utility knife (or any utility knife).
- Strand of twinkle lights.
- Empty frame. (I used a thrift store frame that was 24×36 in size.)
- 1 finishing nail
- Optional: projector

Create Your Chalkboard:
The insulation board is HUGE so depending on the size of your frame, you will have a lot of chalkboards for future projects! The board costs around $10.50 so to keep the cost down on this project it would be a fun one to do with a friend. Once you get your board home (which can be a challenge if you don’t have a truck or minivan), you want to prime it on the shiny side of your board. I primed mine with Bullseye 123 primer spray. If you skip priming, your paint will scratch off fairly easily which you don’t want! Once your primer is dry, apply two coats of flat black paint. You can certainly use chalkboard paint for this project or make your own using sanded grout, but it’s not necessary. Flat black paint works just as well and you don’t need a lot of paint, so feel free to buy a sample pot. I used a foam craft brush for the paint application and coated the board with two coats of Valspar flat black paint.
Once the paint is dry, measure the size of the inside of your frame and cut to measure with a utility knife. You can see that my cut was less than perfect. No worries. If you error on the larger side when cutting, you can easily make adjustments as you are fitting the board inside your frame. I didn’t bother gluing my board in place. I cut the board to fit very snugly inside my frame so gluing wasn’t necessary.

Create your chalkboard image:
I am creative, but I am NOT artistic. I cannot draw to save my life and my lame attempts at doing so are often mistaken for my 5-year-old’s drawings. Case in point, when I was planning this project my big sis (who is an AMAZING artist—so unfair) said, “Why don’t you make the letter o into a pumpkin?” Um…no can do unless I have an image to project and trace! She was like, “But it’s just a circle with a stem on top.” Easy for you to say Ms. Received-All-the-Artisitic-Talent-Genes-in-the-Family *wink*! Anyhow, if you are a blessed artist than you can skip this step. If you need a little *ahem* help in this area, then plan out your imagery in a photo editing software. I put together two free printables I found online using ipiccy.com and saved my image as a jpeg.

Next, I used my 3M projector to project the image from my computer onto my screen and traced it using chalk. If you don’t own a projector, you can try borrowing an overhead projector from your local library or child’s school. Many modern classrooms don’t even use them any longer! You can also do the old square drawing technique where you print the image out on paper, draw graph lines on your paper, do some fancy math, and translate it onto your board. Google it if that’s the route you need to go.

Light it up:
This is where the fun part comes in! Take your finishing nail and carefully poke holes all the way through your insulation board anywhere you would like it to light up.

Take your twinkle light strand and push the light tips through the holes you created. The foam board is thick enough that your light tip will not be exposed on the front of your chalkboard. This is what it should look like on the back of your frame.

Hang on the wall and enjoy:
I didn’t have to do anything special to hang my frame. The twinkle lights add bulk to the back of the frame, but I was still able to hang the picture from a nail on the wall without any trouble.

I think this project would be awesome for a Christmas sign, adorable in a child’s room with their name up in lights, or anywhere you wanted to add a personalized design! I hope you’re inspired to create one of your own.
I am honored to be a Lowes Creator along with an amazing team of creative bloggers. I received a gift card in order to purchase materials for this project. I have another fun Lowes project coming up next week to share with you along with $100 Lowe’s gift card to giveaway. So stay tuned for that!! And be sure to check out the Lowe’s Creative Ideas Magazine.

Related Posts
 16 Thanksgiving Table Ideas {table setting}
 Compound Miter Saws and $100 Lowes Gift Card Giveaway #LowesCreator
 Homemade Chalky Finish Paint Recipe #LowesCreator
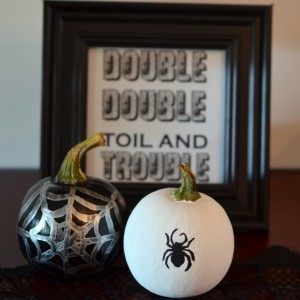 Witch Halloween Mantel Tutorial
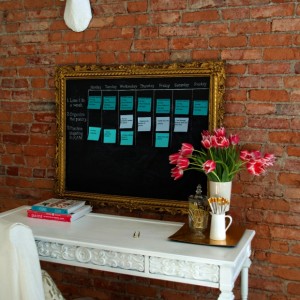 How to Keep Those New Year's Resolutions: DIY Sticky Note Goal Chart
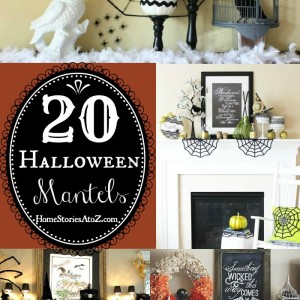 20 Halloween Mantels
 Dorm Room Ideas
 How to Build a Window Cornice
 DIY Halloween Treat Bags


What a perfect project! It turned out so cute! I love this, have seen it done before and have plans for something similar. Thanks for the inspiration, might be the kick I need to get moving.
Debbie 🙂
Wow! I’m speechless. To say your creative is the understatement of the year. I love this Halloween project. Found it via Donna’s SNS Linky Party and was so inspired, I’m your newest follower!
That is INCREDIBLE!! I’m so excited at how easy it actually all is! I think I’ll give it a whirlin’ go! Wish I had a “blog team”. I’ve heard of em, but never had one. Way to go. How FUN!! 😉
Love all your fun projects. You are so talented, Beth!
What a beautiful chalkboard project, Beth–it turned out lovely! I love the fonts used in the graphic.
Love it! I had no idea I didn’t need to use anything special for chalkboards- I’ve been adding non-sanded grout to my paint, nice to know I can skip that part!
If your chalkboard is going to get heavy use I would definitely use chalkboard paint. But if you’re doing a one-time project like this one, it’s not necessary at all. The chalk easily erases off of flat paint for touch-ups.
Oh Beth!! This is amazing!!! I absolutely am in LOVE!!! Great job!! 😉 Bonnie
I love it Beth, what a cute edition with those little lights. Adore. Fb’ed, pinned, tweeted and G+
So cute! Love the lights! Thanks for sharing a great tutorial!
Way cool, pinned this.
Bliss
Wow! Great idea, Beth…love it! I really like the idea of creating your kid’s name in lights for their room. I’m definitely going to keep that one in mind for when I finish the bedrooms. Thanks for sharing this!!
That is AMAZING!! Totally love this!!
This turned out so cute!! Love the addition of the twinkle lights! Great job Beth!
Oh my goodness Beth!! This is just awesome!! I love it!! ~ Lori
I LOVE IT!!! and I love where you chose to put the lights, it looks so great!
Good job and thanks for the toot! I will have to give this a try.
Beth, that is so awesome. I imagine you will be seeing all kinds of versions of this soon!
Delightful!
That’s awesome Beth!! I am totally going to do something with this for Christmas. Thanks so much! Pinned!